No, I don't mean the egg yolk, sugar, vanilla, cornflour kind, I mean the Birds kind. And certainly NOT the 'just add boiling water' variety but the 'mix the powder and sugar with a little milk until smooth, boil up the milk (making a right mess of a saucepan and, if unlucky, the top of the oven too), add and stir until you realise it ain't going to thicken so you have to mess up another saucepan by reheating it until it does thicken' variety.
It takes me right back to childhood. It was one of the ways I 'helped' mum in the kitchen when I was quite a little girl - the mixing part, I mean, not the boiling milk bit. That came later. I liked it so much, especially the skin (I know, weird).
Anyway, I was in Morrisons and saw some and had a craving. Old fashioned custard on mince pie, Christmas pudding, over sliced banana . . . mmmmmmm.
Anyhow, enough of the waffle. It's dead easy to make in Thermione.
Just pop the powder, the sugar and the milk in the bowl, add half the milk and give it a good zizz to make a thin paste, then add the rest of the milk.
Heat to 90, speed 4 for around seven minutes (not totally sure about the timing) until it has thickened.
Finally, give it another good zizz before serving.
I've just made some as a test run. It's really nice although I think I will add a few drops of vanilla to pep it up just a tiny bit. And maybe some cream too, bad me!
So that's the Christmas custard sorted!
Tuesday, 23 December 2014
Sunday, 21 December 2014
Christmas with Thermione
I don't make custard very often so when I do it's usually for something special. Making custard in Thermione is a doddle because there's no need to stand and stir and worry about spiltting or curdling or any other custard-disaster that I've created in the past.
This one is a pouring custard rather than a thick-set custard. I used vanilla seeds and some essence because I wanted the pod for vanilla sugar. Must look out for vanilla bean paste though - that sounds the best alternative. Maybe Lakeland or Hobbycraft - or Amazon?
Enough waffle. here's the recipe.
Ingredients:
250g milk
2 egg yolks
beans from 1/4 vanilla bean plus a little bit of vanilla essence (the proper sort) or 1/4 tsp vanilla paste
30g sugar
1/2 tbsp cornflour (or ordinary plain flour is fine, better maybe)
Method
Place all ingredients in the bowl in the order above. Briefly zizz on 6 to mix everything (don't do this if you've added the bean pod).
Cook for 8 mins at 90, speed 4
Give it a good zizz
Serve.
Sunday, 14 December 2014
Christmas with Thermione: shortbread
This is not my original recipe (is there such a thing for shortbread) but I have adapted (sort of) it for Thermione.
I made this straight but I shall add Christmassy spice to the next batch and perhaps some chopped dried cranberries or pistachios as well.
Ingredients to make quite a lot of little star shaped biscuits.
110g caster sugar (or use granulated and zizz it into caster sugar first)
225g soft butter
225g plain flour
110g cornflour
Line two trays with parchment.
Method.
After zizzing the sugar, if necessary, add the butter, cubed, and briefly zizz on 5 to incorporate. Then add the whisk attachment and whisk at 4 until it is light and fluffy scraping down the sides as needed.
Remove the whisk attachment and scrape off as much mixture as possible back into the bowl.
Add the flour and the cornflour and briefly pulse until all mixed and starting to come together.
Tip out onto a floured surface and bring it all together with your hands - It's very quick.
Deal with half at a time: roll out to about 1/2 to 3/4 cm thickness. Cut into shapes, either using a knife or a biscuit cutter (I used a star cutter). Re-roll and cut the scraps several times, handling the mix as little as possible.
Place the biscuits on two lined trays and chill in the fridge for about half an hour.
Preheat the oven to 170C
Bake the shortbread for about 20 mins or until just turning brown. Cover with parchment if they seem to be cooking too fast.
Leave them on the tray for about 5 mins to firm up, then move to a wire rack. Dust with sugar and leave to cool.
Keep in an airtight container for about 4-5 days.
 |
| These caught a little bit around the edge but they were delicious all the same! |
I made this straight but I shall add Christmassy spice to the next batch and perhaps some chopped dried cranberries or pistachios as well.
Ingredients to make quite a lot of little star shaped biscuits.
110g caster sugar (or use granulated and zizz it into caster sugar first)
225g soft butter
225g plain flour
110g cornflour
Line two trays with parchment.
Method.
After zizzing the sugar, if necessary, add the butter, cubed, and briefly zizz on 5 to incorporate. Then add the whisk attachment and whisk at 4 until it is light and fluffy scraping down the sides as needed.
Remove the whisk attachment and scrape off as much mixture as possible back into the bowl.
Add the flour and the cornflour and briefly pulse until all mixed and starting to come together.
Tip out onto a floured surface and bring it all together with your hands - It's very quick.
Deal with half at a time: roll out to about 1/2 to 3/4 cm thickness. Cut into shapes, either using a knife or a biscuit cutter (I used a star cutter). Re-roll and cut the scraps several times, handling the mix as little as possible.
Place the biscuits on two lined trays and chill in the fridge for about half an hour.
Preheat the oven to 170C
Bake the shortbread for about 20 mins or until just turning brown. Cover with parchment if they seem to be cooking too fast.
Leave them on the tray for about 5 mins to firm up, then move to a wire rack. Dust with sugar and leave to cool.
Keep in an airtight container for about 4-5 days.
Sunday, 7 December 2014
Christmas with Thermione: spiced bread
This came originally from the BBC Good food guide and I have adapted it somewhat for Thermione, making it simpler on the way as Thermomix adaptations so often are.
Here's the original.
I know it looks long and complex but put that down to my comments and so on. Really it is dead easy! Go for it!
It's deeeeeeeeelicious and I am glad I have a loaf and some slices to freeze after scoffing more than I should. It seems to be a very flexible recipe so use what you have.
Ingredients to make two small loaves - I have underlined the ingredients to make then stand out from my comments.
450g strong white flour plus a little extra for kneeding
1/2 tsp salt. The recipe said 3/4 tsp and then specifies unsalted butter. Why??? A lack of common sense here, I suspect.
2 tsp ground cinnamon
85g sugar. The original recipe asked for light muscavado. I didn't have any (ooops, where's my shopping list?) but I had some soft light brown sugar so I used that and the dregs of a pack of golden caster sugar.
2 tsp dried yeast. The kind for breadmakers that doesn't need activating (so much less hassle in this recipe as you will see if you follow the link)
200mls milk. Recipe says whole fat, I only had semi-skimmed. Tough!
50g butter plus extra for greasing. The recipe said unsalted. I fail to see why when you are adding salt so I reduced the amount of salt to 1/2 instead of 3/4 and use what I had - salted butter.
2 medium eggs. I only had large so I reduced the milk a bit.
50g walnut pieces. I'd use pistachios if I had any.
85g dried cranberries. The recipe said raisins. I had cranberries!
1 egg yolk to glaze (I didn't bother)
Method for Thermione.
Into the bowl place the flour, salt, cinnamon, sugar, yeast and butter. Zizz on 4 for a short while to mix everything up and 'breadcrumb' the flour and butter.
Add the milk and the eggs, mix briefly and then knead for 10 minutes.
Turn the dough out, form into a ball and place in a buttered bowl. Cover with oiled clingfilm and leave to double in size
Prepare the loaf tins (so you don't get caught out later).
Knock back the dough. Knead in the walnuts and cranberries
Divide the mix into two and shape. Place each loaf into a loaf tin, recover with the oiled film and leave in a warm place until dough reaches the top of the tin
Preheat the oven to 200C (gas 6)
Bake for 20 mins, then cover the top with foil, lower the heat to 180 and bake for another 15 mins or so until done.
Cool on a wire rack.
Eat and enjoy. I did! Very much.
Saturday, 22 November 2014
Christmas without Thermione! Turkey stock
OK, so for once Thermione doesn't feature.
I needed (well, wanted) to make some turkey stock for the gravy and this is what I did.
I bought a turkey leg - one that included the top bit as well, not just the drumstick part. It was £4.49 which seems a lot for stock to make gravy but I got a lot more out of it than just gravy.
I also used some streaky bacon, a dash of old wine and some mixed vegetables (fresh soup mix veg) plus some seasonings - rosebary and bay - from the garden.
First I put the wine, the vegetables and the herbs in a roasting dish, topped them with the two parts of the turkey leg, grated over some pepper and then covered the turkey with the streaky bacon.
It then went into a medium oven to slow roast for a while - I think it was two and a half hours all in, maybe a bit more. The meat was nearly falling off by the end.
As soon as it was all cool enough to handle, I took out the turkey and put the veg and stock into my pressure cooker (you could use an ordinary sauce pan for this bit), removed the bacon (which I crisped up and had crumb;ed over lentil soup), pulled all the meat off the bones and put all the leftovers into the pressure cooker too - skin, nasty bits - the lot. Then I reboiled it under pressure for around half an hour.
Then I strained off all the bits which I discarded and let the stock bubble away for a while to reduce it down a bit before cooling and freezing. I didn't add any salt (apart from what came off the bacon) because I will salt it the other end!
This made a lovely, jellied stock which should make a good accompaniment to the turkey on Christmas day when gravyfied. I will boil up the giblets, etc, beforehand to add to it and there will be some left over to make soup at a later date.
As for the turkey, of which there was loads and loads, I gave half of it to my daughter for her cats who love it and the remaining half made a great turkey curry, some of which is in the freezer for meals later on.
So not bad value at all, was it?
Sunday, 9 November 2014
Christmas with Thermione: Cranberry sauce
I've posted this once already but I rather like the 'Christmas with Thermione' thing and thought it might make a sort of mini-series in here. So here it is again. By the way, I've had it now, with a turkey dinner, and it was lovely. A very soft sauce, not much jellied, really delicious . . .
I might use a cooking apple next time but I just used what I had at the time and that didn't include a cooker. Also some spices.
Here's the recipe, made out of my head, but nothing original except that I have never used Thermione to make a preserve before.
I like smoothish sauces. By that I mean no bits but not a clear jelly. Smooth with texture.
This is what I did.
Ingredients to make one jar of the Bonne Maman size.
200g frozen cranberries (I'd use fresh but they're not in the shops right now)
1 eating apple, washed, any bad bits cut off (and I also remove the stalk and the blossom bit too), chopped. No need to peel and core.
100ml (which is 100g weight) water
juice of half an orange and half a lemon
sugar (I used granulated)
Method:
Place the chopped apple and the cranberries, the orange and lemon juices (no need to thaw them) into the bowl and add a MCful of water (that's 100mls). At this point you could also add spices. I didn't, not this time, but cinnamon, mixed spice or star anise all would go very well.
Cook the fruit (and spices, if using) on 100 for around ten minutes on a slowish reverse speed, about 1/2 - reverse so that if you're using whole spices they won't get chopped to bits. When that has finished, check that the fruit is soft and mushy, take out any whole spices and blitz for around 10 seconds on speed 6.
Remove the lid very carefully (it is hot!) and pour the lot into a fine sieve over a bowl. Push the fruit through and discard what is left in the sieve.
(then put the sieve straight into a bowl of hot and soapy water because if you let it cool it will be the very devil to clean)
Now add the sugar. To be honest, I didn't measure it, I just stirred some in and tasted, stirred more in and tasted, until it was 'right'. As the mixture is hot, the sugar will dissolve quickly.
Pour the mixture back into the thermomix bowl. (I rinsed it out in between but I don't think you actually have to, it was just automatic to put it straight into water)
Put a saucer in the fridge if you use that method to check for set.
Cook on Varoma heat, reverse speed 2 for around 6 minutes, then check for set, removing the bowl from the base as you check. If not set, cook for a couple more minutes and try again. If adding alcohol (e.g. port), add it after setting and give the mixture a few more seconds of stirring.
Pour into a clean, warm jar and seal. Don't forget to label the jar when it has cooled. Keep in a cool, dark place (I will keep it in the fridge)
 |
| Not my photo but it will look like this. |
PLEASE BE VERY CAREFUL.
BOILING JAM IS EXTREMELY HOT AND HURTS IF YOU SPLASH SOME ON YOUR HAND.
I might go back in this blog and look for other Christmas recipes that can be done in Thermione. :-)
Christmas with Thermione: Bread sauce
This is definitely NOT my recipe. It is from the one-and-only Delia's web site and I have used it for years. It is truly delicious, if a bit of a faff.
However, with Thermione it becomes much less of a faff and the dishwasher deals with the rather messy results.
The original recipe is here so I won't post the amounts, and this is what I did.
First of all I zizzed some bread into breadcrumbs. I used what the recipe said but it looked a bit runny half way through so I added more. Next time I will make more to start with and freeze any not used (or keep them for Boxing Day bubbles and squeak patties)
I peeled a large onion and halved it crossways. I used nutmeg so in went a good grating. Sometimes I use both nutmeg and cloves which works really well.
Into the bowl went the milk (semi-skimmed, although full fat would be nice), the bay leaf, the peppercorns and the nutmeg. I also added a little salt but it can always be adjusted at the end, if necessary.
I brought it up to boiling point, staying in the kitchen because I wasn't sure quite how long it needed but I forgot to note how long it actually took. It was on reverse speed 1 as I didn't want to smash the onion, etc to bits.
Once it had reached boiling, I took the bowl off the base, covered it with a towel and left it to steep so the flavours all developed.
When I was ready, I used a slatted spoon to remove the onion, bay leaf and as many of the peppercorns as I could.
Then I tipped in the breadcrumbs and some butter, put the bowl back on the base and gave it 20 mins at 90, stirring speed. Then I checked and felt it was a bit thin so added some more breadcrumbs. Off came the bowl again, back in went the onion and bay leaf and it stood until just before needed.
Finally I removed the onion and bay leaf again, added the remaining butter and some cream, zizzed it briefly and then reheated to 90, speed 1. I checked the seasoning and added a bit more salt and a bit of white pepper.
(In the interests of frugality, I did wonder about re-using the onions in a soup but couldn't be bothered. It's an option though, and the bread sauce bits that cling would help to thicken the soup)
It was scrummy! That's the way for me from now on, for sure! I shall make it the day before and just reheat it in the microwave, I think. That means the very last bit - adding the butter and cream, etc - can be left until then.
And if you've never made bread sauce before - do consider it. It's amazing with turkey (or chicken).
Thursday, 6 November 2014
Winter soup - an idea, not a recipe
What with it getting cold. those dark evenings and gloomy mornings and facebook messages about snow and sleet, thoughts turn to thicker, pulse packed soups that stick to your ribs and fill you for ages.
I had a packet of country soup mix in the cupboard - not the fresh veg kind I go on about but the dried pulse kind that has a range of stuff - pearl barley, lentils, dried peas, kidney beans, chick peas - you get the idea.
So I did the usual: sauteed that fresh veg soup mix (about 200-ish g) in butter for ten minutes, added some crushed garlic, two stock pots, about a third of the packed of dried soup mix which I had soaked overnight, a good pinch of mixed herbs, a good pinch of mustard powder and a squidge of chilli puree from a tube. Oh, and a good grinding of pepper.
I then topped it up to the 2 l mark with boiling water, brought it to a good boil for 30 mins and then let it simmer for an hour or so until all the pulses were soft.
Without zizzing, I ended up with a thick soup with sort of soft lumps. I added a little bit more water but you could add milk instead. I gave it just a short zizz because I wanted a bit of texture.
I did it in Thermione but you don't have to and I ought to have used my pressure cooker to save on cooking time. Next time I will although I can just leave Thermione and get on with other stuff whereas I don't feel I can just leave the pressure cooker.
I now need to experiment with different stocks and seasonings. I think gammon stock would be scrummy if it wasn't too salty, and I could add shreds of ham too. Or turkey stock, of which I will have gallons after Christmas.
Sunday, 2 November 2014
Chestnut and lentil soup
The 'inspiration' for this was two packets of vacuum packed chestnuts (Merchant Gourmet) that were < cough > ready to use (and some)!!
I made it and it was a little thin so I added some lentils and cooked it up again. Very nice! I might freeze this one for a lunch over the Christmas holiday although I might have some of this before then - like today!.
Ingredients to make a lot
about a third of a fresh veg soup mix (I used the one from Morrison's, of course)
one onion, peeled and chopped
one medium potato, peeled and chopped
a blob of soft butter
two knorr vegetable stock pots
two packets of merchant gourmet vacu packed chestnuts
some red/orange lentils
a good grinding of nutmeg
some garlic (I used crushed garlic in a jar - about half a tsp)
boiling water
pepper
(I also had some white wine left, just a bit, so I added it)
Method
Put the veg and the butter in the Thermomix bowl and give them a gentle reverse spin so that the butter coats the veg.
Saute at 100, reverse speed 2, 10 minutes
Add the remaining ingredients and top up to the 2l mark with boiling water (and add wine at this point if you're using it). When I use commercial stock, I tend not to add any more salt but it's really to taste and you can add some at the end if you feel it is necessary. I don't.
Cook at 100, speed 2 for 15 mins.
Allow to cool a bit.
Zizz on 10 for around a minute, going up to speed slowly and bringing back down again slowly.
Check seasonings and adjust if necessary
It's very smooth, very 'creamy' and really rather nice. Definitely good for Christmas.
Saturday, 1 November 2014
Ham pie and ham soup
The background is that I was staying with Mum and Dad. Mum's a great cook, makes lovely traditional food, always cooks too much, loves to feed people . . . you get the idea, I am sure
The first night I was there she cooked a baked ham. A gorgeous, long, lean, easily sliced ham (from Morrison's which, in my opinion, has the best reasonably priced and easily available hams around).
SO - first night we had it sliced with a sweet and sour sauce. Next day we had it with a salad for lunch. Third day we had ham sarnies for lunch.
Then we had ham pie for dinner. I made the innards like this.
Ingredients:
Some shop bought puff pastry (Mum's not daft!)
Some oil or butter (preferably unsalted)
A thick slice of ham, torn into chunks by hand, all visible fat removed.
One onion, peeled and chopped
Half a yellow pepper, chunked
Half a parsnip, peeled and chopped
Three mushrooms, sliced
a medium potato, peeled and chopped (an afterthought as the sauce was rather salty but it worked really well)
Ham stock (from cooking the ham, just make sure it's not too salty!)
Some mustard powder
Some mixed herbs
Some flour to thicken
pepper (no salt needed)
What I did
Heat some oil or butter in a pan. Add the onion, parsnip and potato, stir well, turn the heat right down and gently saute (covered) until the vegetables are softening.
Add the yellow pepper and the mushrooms and continue to saute for a few more minutes.
Remove the veg from the pan with a slatted spoon, if possible, and set aside.
Mix some plain flour with some oil or unsalted butter to make a roux. Put it in the pan and cook it out for a few minutes, stirring constantly. Make sure it doesn't catch. Add the ham stock, one ladleful at a time, stirring well (I used a whisk) and continue to heat to thickening point.
You are aiming for a thick-ish sauce.
Add the mustard powder, pepper (I used white pepper for this) and the herbs and stir in well.
Add the vegetables and the chunks of ham and continue to simmer it all. Keep tasting and keep your fingers crossed that it isn't too salty - it shouldn't be with the potato in it.
I have to admit that at this point I would eat it just as it is but Mum used it as the filling for a pot pie and we ate it with peas and carrots. She only used a bit of the sauce in the pie; the rest she just diluted a bit and used as gravy.
Me? I would add rice or orzo when I added the meat and veg to a thinner sauce and simmer it until it was cooked, the starch creating its own thickness. A sort of not-in-any-way-a-risotto!
There was some filling left, also some gravy, peas and carrots so we piled it all into one pot and it made soup the next day for lunch. We just zizzed it all up and slackened it a bit with some milk because it was very thick. Gorgeous.
And there was still some ham to slice. It was quite a joint!
Sunday, 26 October 2014
?????
I was researching soup recipes on the internet. OK, maybe 'researching' is slightly misleading. I was looking for recipes!
I looked up one and the first ingredient was 'one can of vegetable soup'! What????????????????????
NOT one to try!
I looked up one and the first ingredient was 'one can of vegetable soup'! What????????????????????
NOT one to try!
Saturday, 25 October 2014
Spiced carrot and lentil soup
Found this on the BBC food site (great place), adapted it somewhat for Thermione and my trusted and tried soup method and it's delicious. Warming and filling.
Spiced carrot and lentil
soup
1 - 2 tbsp curry paste ( used Patak's korma paste and it was a heaped serving spoonful)
1 onion, peeled and chopped
2 carrots, peeled and chopped (or fresh soup mix veg, which is what I used, 200g of it)
2 carrots, peeled and chopped (or fresh soup mix veg, which is what I used, 200g of it)
a bit of soft butter
140g red lentils
1l hot vegetable stock (water and veg stock
pot)
Method
Put the veg and the butter in the bowl. Reverse mix to coat the veg in the butter. Saute on 100, reverse speed 2 for 8 mins
Add the curry paste, reverse mix briefly and
saute again as above for 4 mins
Add the lentils, the stockpots and the
boiling water.
Cook on 100 for 20 mins, speed 2/3
Allow to cool slightly, then zizz on 10 for
around a minute. If too thick for your taste, top up a bit with boiling water.
Serve with a blob of natural yogurt.
Lentil, chicken and veg soup
I'm making this a new entry because it's delicious although a very, very simple addition to my last entry.
Make the carrot, sweet potato and lentil soup as below.
Then add some frozen mixed veg and some chopped chicken. I used uncooked chicken but it would be an ideal way to use those little bits that come off when you have boiled a chicken carcass. Amounts are to your own taste really but if you think of those plastic takeaway containers, I used a containerful of veg and the equivalent of one small chicken breast but I had already consumed some of the soup.
I just boiled it all up on 100, reverse speed 2 (reverse speed is important or it will all just mush up) until the veg was cooked (the chopped chicken took only minutes to cook, of course). That's all!
Looking forward to lunch now!
Here's the original recipe again:
Ingredients:
two carrots, peeled and chopped
one small sweet potato, peeled and chopped.
about 1/4 of a bag of fresh soup mix veg (Morrisons - still brill value)
soft butter
2 knorr veg stock pots
a good pinch of mixed, dried herbs
a grinding of pepper
four tbsp red lentils
boiling water
Method:
Put the vegetables in the bowl and add the butter.
Mix on 4, reverse speed 4 for about 5 seconds
saute on 100, reverse speed 2 for 10 minutes, pushing down the sides if needed
Add the remaining ingredients with enough boiling water to reach the 2 litre mark
Cook on 100, speed 2, 20 mins.
Allow to cool for a short time, then zizz on 10 for about a minute.
This doesn't make a very thick soup, it makes a more fluid, totally delicious and filling soup.
Carrot, sweet potato and lentil soup
Another variation on a theme. Thermione based but, as always, easy enough to do on the hob, just not as trouble free as in the Thermomix.
I had two manky carrots, one shrivelling sweet potato and a bag of fresh soup mix veg. I always have lentils in the cupboard.
This is what I did.
Ingredients:
two carrots, peeled and chopped
one small sweet potato, peeled and chopped.
about 1/4 of a bag of fresh soup mix veg (Morrisons - still brill value)
soft butter
2 knorr veg stock pots
a good pinch of mixed, dried herbs
a grinding of pepper
four tbsp red lentils
boiling water
Method:
Put the vegetables in the bowl and add the butter.
Mix on 4, reverse speed 4 for about 5 seconds
saute on 100, reverse speed 2 for 10 minutes, pushing down the sides if needed
Add the remaining ingredients with enough boiling water to reach the 2 litre mark
Cook on 100, speed 2, 20 mins.
Allow to cool for a short time, then zizz on 10 for about a minute.
This doesn't make a very thick soup, it makes a more fluid, totally delicious and filling soup. If you want it thicker, don't add so much water.
I had some for lunch yesterday and will be having more today. I'm going to add some frozen mixed veg and cook it a bit more in Thermione for a chunkier effect. I might add some bits of chicken that I have in the freezer. Some shredded ham would be lovely, if I had some, or Morrison's sell cold meat 'bits' very reasonably - some of that would also lift it to full meal status.
Lucky I like soup, isn't it, especially adaptable soups like this?
Friday, 24 October 2014
Info
Just to let you all know, Blogger seems to have reinstated the security thing on my blog. No idea why but never mind, it is nice not to have to delete stuff in the Spam folder every day.
Sunday, 19 October 2014
Potato and leek soup: Thermomix and frugal
As always, can be made the conventional way too!
Yet another . . . basically the same method, made with bits and bobs. I had four little pots of home grown leek bits in the freezer, from when I did Live Below The Line. As I am trying to get some logic and system into my freezers, I was going to throw them out but then had a little think.
I used Morrison's Value canned potatoes because I had them, they're frugal and the 'fresh' ones I had in the fridge were far from. They are now being recycled! The remaining canned spuds will be roasted (oh, OK, possibly fried and as I'm having bacon for breakfast, I guess they can fry or roast in the bacon fat which will be scrummy) for dinner.
The amounts can be variable - it almost always is in soup, isn't it?
So - here it is
Ingredients:
Some sliced leek - I would say I used around 1/4 of a leek all together - sliced. You could use green bits for this, the bits that get chucked usually but which have such flavour.
a small onion, chopped
soft butter - a knob
1/4 tsp crushed garlic (I get this on jars from Morrisons - saves time and is great value)
half a can of potatoes, diced.
one Knorr vegetable stock pot
pepper
a good pinch mixed dried herbs
boiling water
Method.
Put the leek and onion in the bowl and add the butter and the garlic. Give it a reverse zizz for a few seconds to coat the veg with the butter. Then saute for 10 minutes on 100, reverse speed 1 or 2.
Add the potatoes, the stock pot, the pepper and herbs and top up to the 1 litre mark with boiling water.
Cook on 100, speed 2, 15 minutes.
Allow to cool slightly, then blend for about 30 seconds, increasing speed gradually until it is top speed. It doesn't need any more than that.
You know what? It has made a very tasty soup indeed - I've had the little bit that wouldn't fit into the freezer containers. Nothing 'OTT special' but most acceptable. Four portions of 250mls so enough for a good lunch for two probably with leftovers.
I'm going to price it out as much as I can.
The leeks were free (from the garden) so I can't price them out.
Butter: about 10p
Onion: about 5p (it was small)
Stock pot: 25p - the most expensive item in the whole recipe!
Crushed garlic: about 4p
Potatoes: 8p for half the can
Dried herbs: Neg so say 2p. I bought a huge big bag of them for not a lot.
Pepper: Not even trying to cost a few grindings - 0p
Total: 60p (not including leeks and rounded up), so 15p per portion. Can't complain about that for something that is very tasty. You could serve with a dash of milk or cream or some grated cheese - always delicious!
The reason why I portion in 250mls is simply that it's the size of my pots, full to the top with no air space and therefore space wastage. It's fine for a school lunch with bread and butter and fruit or cake.
The negative is that I clear my freezer of four titchy pots of leek and end up with four larger pots to freeze instead. :-)
Saturday, 18 October 2014
Butterbean and veg soup: Thermomix and frugal
Another in my series of 'same but different'.
This is like the lentil and veg soup but with butterbeans instead and it is thick, warming and extremely tasty. Here we go - for Thermione as always but easily adapted to conventional methods.
The butterbeans I used were home cooked and frozen. There were 270g's worth of butterbeans with a little of the cooking liquor to stop them drying out.
Ingredients:
half a bag of Morrison's veg soup mix (a mix of leek, swede, celery and carrot)
one smallish onion, chopped small.
a knob of soft butter
270g cooked butterbeans
2 knorr chicken stock pots
half tsp crushed garlic
boiling water
pepper (no salt - the stock is salty enough)
boiling water
Method
Put the veg and the chopped onion in the bowl with the chopped onion. Add the knob of butter and zizz on reverse speed 2 or 3 to coat the veg in butter.
Saute on 100, reverse speed 2 or 3 for 10 mins, occasionally pushing down the sides of the bowl.
Add the garlic, butterbeans, pepper and enough boiling water to take it up to the 1.5 litre mark.
Cook on varoma heat, 20 mins, speed 2 or 3.
Allow to cool for a short time, then blend on top speed (get there gradually) for one minute, then reduce the speed gradually. The soup should be thick, silky smooth and delicious.
Serve with grated cheese or a blob of cream or yogurt. Delicious.
Oh, and it has made six 250 ml portions, so a good serving for four.
Monday, 13 October 2014
Sweet potato and veg soup: Thermomix
Just like the last one really, with few changes.
Ingredients
3 smallish sweet potatoes, peeled and chopped
1/3 bag of Morrisons vegetable soup mix - the fresh kind that's about 67p per bay at the moment
1 medium onion peeled and chopped
40-ish g butter (soft)
2 knorr vegetable stock pots
1/2 tsp crushed garlic
1/2 to 1 tsp curry paste. I used korma as that's what I had.
boiling water
Method.
Put the sweet potato, soup veg and onion in the bowl with the butter.
Reverse mix on 4 to coat the veg with the butter. Then saute for 10 mins, 100, reverse speed 2 to 3
Add the remaining ingredients top up to 1.5 litres with boiling water. Cook on Varoma heat for 20 mins, speed 2 to 3.
Allow to cool a bit, then blend at top speed for one minute.
The result is a silky smooth, tasty soup.
Sunday, 12 October 2014
Lentil and vegetable soup
We are well into the season of mists and mellow fruitfulness now and a cook's thoughts turn to soups. Thick, home made soups, silky smooth and filled with flavour and goodness. Soup of the evening (or lunchtime). Beautiful, beautiful soup.
So here's the first one of the season (apart from the best ever tomato soup I posted a short while ago). When I was unwell last week I bought a bag of 'soup mix' vegetables from Morrisons with expectation of making soup, but in the end I didn't. It is just a bag of chopped carrot, leek, celery and swede - basically a great soup starter which the Hairy Bikers call 'the Holy Trinity' (without the swede). It's actually quite a frugal thing to get in certain circumstances because to buy all the veg separately would cost a lot more so I reckon I'm going to be getting this particular time saver again.
It needed using up so this is what I did. I used Thermione, of course, but it is easy to adapt it for hob cooking.
Ingredients:
about 2/3 of a bag of Morrisons vegetable soup mix
1 medium onion, chopped
50g (ish) soft butter
4 heaped tbsp lentils
1/2 tsp crushed garlic (from a jar)
2 Knorr vegetable stock pots
boiling water
I didn't add salt or pepper because the stock pots are well seasoned.
Method.
Place the vegetables, including the onion) in the bowl and add the butter. Give a quick zizz on reverse spin speed 4 to coat the veg with the butter.
Saute the vegetables on 100, reverse speed 2, 10 minutes
Top up with boiling water to the 1.5l mark. Add the lentils, the garlic and the stock pots.
Cook on Varoma, speed 4, 20 mins.
Allow to cool a bit before blending at top speed for a minute.
My goodness, for such a simple list of ingredients, it is a delicious soup. I shall add a little cream and reheat to 90 before serving with bread and butter and maybe some grated cheddar on top. A whole meal in a soup and I am hoping there will be enough for school lunches.
If you wanted it to be lower calorie, use less butter, but it does impart a wonderful flavour in the saute-ing process.
There's about a third of the bag of veg left and I also have some sweet potato and some butter beans for another soup. I think I might get out my second Thermomix bowl and use it for the very first time ever!! I'll let you know how that goes!
Sunday, 5 October 2014
White bread (refined)
I've refined the ordinary white loaf recipe that I use week by week. I nearly said 'my' recipe but, of course, it isn't. It is from the gorgeous Mr Hollywood. The additions are not original but they are 'mine' in that I didn't look them up anywhere or copy someone else's recipe.
Anyway, this is now what I use
500g strong white flour (or replace up to half of it with ordinary plain white flour for frugality as I often do).
a heaped tsp dried yeast (or one and a half tsps as dried yeast doesn't really 'heap')
1 tsp sugar
1 tsp salt
25-30g butter
1 tbsp dried milk powder
315mls warm water
It makes a delicious, soft white loaf with a crusty outside. I make it in the same way as always in Thermione.
Flour first, then all the other dry ingredients and the butter.
Blitz on 6 until butter is incorporated and everything is mixed well.
Add the water.
Blitz on 6 again until mix comes together.
Knead for ten minutes, then allow the dough to rise in the bowl.
Knead for 1 minute to knock back the dough, then remove, shape, prove and bake. I make two loaves in one pound loaf tins.
Dead easy, better than bought and totally frugal!
Saturday, 4 October 2014
Pear and cinnamon jam
A few weeks ago a friend gave me a big bag of pears from her garden. They were lovely - sound and still very firm. I lay them out and they have been slowly ripening as pears do. I should have used them last weekend but between lack of time and not feeling wonderful, I didn't.
I looked up the spices that go well with pear and fancied cinnamon (I could have used cloves or ginger too). This is what I did.
I peeled, cored and chopped the pears and placed them in a bit of water and lemon juice (from a bottle). The lemon juice was not only for preventing browning but also to help with setting as pears, I gather, are low in pectin. Each time I added more chopped pears I gave them a little stir to cover them with the lemon-water.
When they were all prepared, I added water until about half way up the pears, added a small stick of cinnamon and simmered it all until the pears were soft but not mushy.
I measured out the pear mixture and to each pint I added about 1lb of jam sugar, stirred it all well and allowed it to stand until the sugar had disolved completely. I added a bit more lemon juice too, just to be on the safe side and also because it is a very sweet mixture.
Then into the fridge went the saucers, into the oven went the sterilised jars and onto the heat went the maslin pan. It boiled away vigorously for about ten minutes or so and the first time I tested, it had reached setting point. Quite a soft setting point but that's what I wanted, because the chunks of pear remained distinct, they didn't mush into the water at all.
I removed the cinnamon stick before pouring into jars and sealing.
Not terribly scientific, is it, but it seems to have worked and it tastes and smells wonderful. I've never made jam with pears before so I wasn't at all sure but it worked! I now have nine pots plus a little left over for my breakfast toast tomorrow morning (or maybe in a little while on my fresh made bread).
I think when I make it again I will use a little less sugar and see how that works. It might also be nice if the pears are pureed. Nice to have choices and alternatives.
Sunday, 28 September 2014
Cheese scrolls
I've just made these and at the moment I am having great difficulty stopping myself from troughing up the lot! Really delicious!
I made the dough in Thermione but it can be made the more conventional way - just use oatmeal instead of whole oats, mix the dry, rub in the butter, add the water and knead until it is a nice stretchy dough. Leave to rise, knock back and shape.
So here we go.
Ingredients:
for the dough:
100g oats
400g strong white flour
1.5 tsp dried yeast (the totally instant kind)
1 tsp salt
30g butter
2 tbsp dried milk powder
330mls warm water
for the filling
greated cheese
salt, pepper and mustard powder
Method:
Put the oats in the bowl and blitz at 9 or 10 until powdery
Add the flour, yeast, salt and milk powder and mix on 6 for a few seconds
Add the cubed butter and zizz again until butter is all absorbed (4 or 5 seconds is all it takes)
add the warm water, mix briefly and then knead on the dough setting for 8 minutes.
Allow to rise in the bowl.
This makes a soft dough so I used plenty of flour and also oiled my hands. Tip dough out (scrape round the edges of the bowl) and knead briefly. Divide into two and use one half to make a normal shaped loaf unsing a 1 lb loaf tim.
With the other half, shape into a rectangle and roll out until about 1cm thick. Spread over the grated cheese and then sprinkle over the salt, pepper and mustard powder. Starting from one end, roll up tightly and then cut into pinwheels. Arrange the circles on a lined baking tray.
Cover the circles and the loaf in the tin and allow to prove (takes around half an hour or so).
Preheat the oven to 230, then as soon as the bread is in, reduce it to around 190. I put the loaf on the higher shelf and the scrolls on the lower shelf.
Bake until done (around half an hour if using a non-fan oven, probably quicker for the scrolls if it's a fan oven).
Cool on a wire rack - and try not to eat the lot while it is all still warm!
Saturday, 27 September 2014
A quick (very quick) lunch
I threw this together one morning last week.
I was frying tomatoes and decided to do more and use some for lunch. That's what started it off.
Ingredients:
some cooked rice (I used half a pack of ready cooked rice)
A small can of tuna (I used a value can which is quite small)
Some chopped mushrooms
some tomatoes that have been fried in butter
a bit of salt and a bit of pepper
soy sauce.
What I did.
I piled the rice into a sealable microwaveable plastic carton.
On top I added the tune, the mushroom and the fried tomatoes and stirred the lot together with a bit of salt and a bit of pepper. I took it to school and at lunchtime I heated it in the mucrowave at school before adding some soy sauce.
It was surprisingly scrummy and made enough for two meals as it was filling.
A bit of grated cheese would have been nice but I didn't think of that at the time.
Sunday, 21 September 2014
Spiced blackberry, apple and plum jam
This carries on from where the last one finishes.
I have a sieve full of fruit after straining some stewed blackberries, apple and plums. I wanted a clear jelly so did't push anything through the seive which meant that there was still quite a lot of pulp there.
I used my mouli to get the rest of the fruit juice and flesh from the pulp and threw the rest away - mostly seeds, pips and skin.
I then mixed in an equal amount of jam sugar, the juice of half a lemon and some mixed spice. It went into Thermione where it cooked at varoma heat, reverse spin for around seven minutes. I then checked it for setting point and it was fine. And that was that.
I got two little pots of jam out of it with a bit that wouldn't squeeze in so I had it on a rice cake and it was truly delicious.
I like making stuff from what would otherwise be thrown away.
blackberry, apple and plum jelly
I was given some blackberries (thanks, K) and I had some apples that someone else had given me (eaters) and some purple plums that needed using up.
I chopped the fruit up a bit and simmered it all in some water until everything was soft and mushy. Then I strained it through a seive and let it stand like that for a couple of hours.
I them measured the liquid and added jam sugar in the proportion pint/pound plus the juice of a small lemon.
There wasn't loads so I used Thermione to boil to setting point. If there had been more, I'd have done it in the conventional way. It did take quite a while.
I checked for set using the saucer method.
It tastes wonderful although hasn't made all that much. That's jellies and jelly bag type methods for you.
I am a bit anti making clear jelly jams as I don't like the waste, but I then pushed the leftover fruit bits through my mouli and have a some unclear, thick 'sauce'. I think I will add some spice and make some sort of sauce or spicy jam (almost the same thing really). See separate entry . . .
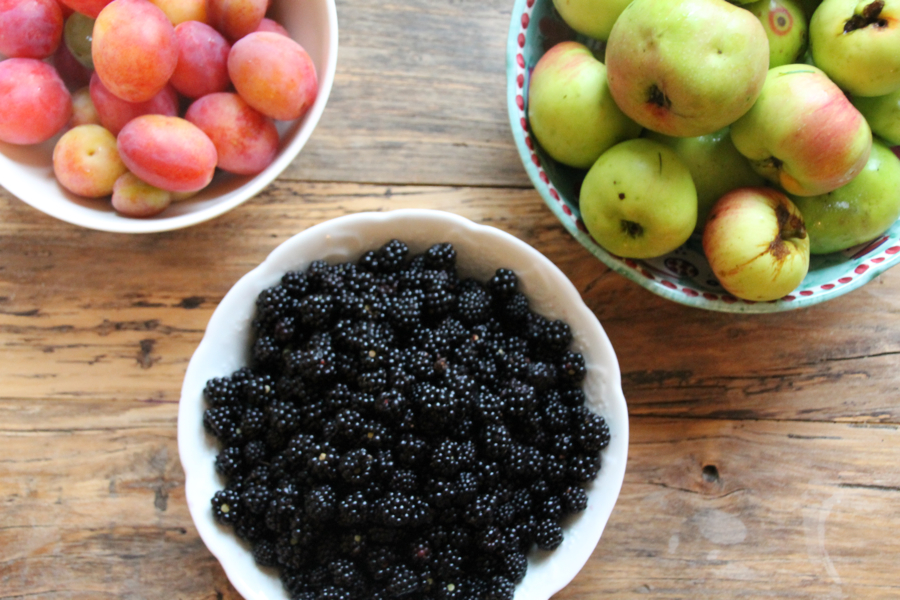 |
| Not my photo and I know the plums are the wrong kind! |
I them measured the liquid and added jam sugar in the proportion pint/pound plus the juice of a small lemon.
There wasn't loads so I used Thermione to boil to setting point. If there had been more, I'd have done it in the conventional way. It did take quite a while.
I checked for set using the saucer method.
It tastes wonderful although hasn't made all that much. That's jellies and jelly bag type methods for you.
I am a bit anti making clear jelly jams as I don't like the waste, but I then pushed the leftover fruit bits through my mouli and have a some unclear, thick 'sauce'. I think I will add some spice and make some sort of sauce or spicy jam (almost the same thing really). See separate entry . . .
Chilli tomato passata
Made yesterday. It's an idea: amounts are variable! I have no idea whether it should be called a passata but never mind.
One comment: because the first chilli I used seemed mild, I bunged in two and didn't seed them. Er - let's just say next time I will take out the seeds!!!!!
I used:
Loads of flavoursome tomatoes. Enough to fill a good sized roasting dish. Cut into wodges and cut out any 'bad bits' but keep the cores, etc, for flavour.
2 medium onions, peeled and chunked
some celery, cut into chunks
olive oil - it's a slow roasting thing so OO is fine.
2 bay leaves, torn into bits
some dried mixed herbs (or whatever from the garden)
Some garlic.
2 chillies
a good pinch of sugar
a sloosh of balsamic vinegar
some sea salt
(and anything else you fancy - if I had some wine I would add some, but I don't)
Put the lot in a good sized roasting dish and stir around until everything is coated with the oil.
Place in a show oven and roast until all soft and gooey. Cover with foil if necessary.
Push through a fine sieve or mouli. Check seasonings and adjust. Freeze in sensible sized portions (or use straight away because it may be very hot the way I made it but it is so gorgeous!)
Sunday, 14 September 2014
Soft white bread rolls: thermomix
These are really nice. After a fairly (oh, OK, totally) disastrous effort with a different recipe yesterday, I found this today and converted it for Thermione. If you want the conventional method, please follow the link below.
It comes from a blog at http://amumwholovestobake.blogspot.co.uk/2011/10/soft-rolls.html which seems to have been abandoned; a shame because there's some jolly good recipes there - well worth a visit.
I've just had one warm with butter and mmmmmmmmmmmmmmmm. I shall definitely use this when I want soft rolls from now on. It's on the 'do regularly' list. Thank you very much, mum who loves to bake!
You need:
500g strong white flour
1 tsp salt
1.5 tsp dried yeast
1 tbsp soft, brown sugar
50g butter, cubed
170mls milk
170 mls hot water (so that when it is mixed with the milk it makes a lukewarm liquid)
Method:
Put the flour. salt. yeast, sugar and butter in the bowl and blitz for about 5 seconds on speed 6 or 7, until the butter has 'breadcrumbed'.
Mix the milk with the water and pour into the bowl.
Knead for 10 minutes.
Push down any dough that is sticking to the side and sprinkle over some flour. Replace the lid and MC and leave to rise.
When it is doubles in size, top out onto a floured or oiled surface and bash down again, getting as much air out a possible.
Shape into rolls (I managed to make 14 but I don't like hugely ginormous rolls and they do rise a fair old bit) and place on a lined oven tray (I use a teflon sheet). Cover with oiled clingfilm or easyleave to prove.
Heat the oven to 170C
Place the tray on the middle shelf and bake until cooked.
Remove from oven and place on a cooling rack. Cover immediately with a clean tea towel (or similar).
Saturday, 6 September 2014
Recipe: Roasted tomato sauce
This was posted on a page on Facebook called Allotment and Vegetable Growers. I've scrolled down and can't find it so huge apologies to whoever posted it and I will edit this if I find the source (no pun intended).
It makes a delicious sauce, quite sweet in a good way. Salt/pepper/other seasonings can be added when you use it.
Roasted tomato sauce
Ingredients
2k ripe tomatoes
2 large onions, peeled and sliced
4/5 cloves garlic, sliced
1 tsp fresh thyme or 2 tbsp chopped fresh marjoram or oregano
1-2 tsp soft dark brown sugar
1-2 tsp balsamic vinegar
4 tbsp olive oil
Method
layer the ingredients in a roasting dish, starting with the onions and garlic and covering the onions with the tomatoes.
Roast at 170 for an hour or more until everything is soft and slightly charred.
Push through a mouli or a sieve to get rid of all the bits.
Freeze in portions.
Saturday, 30 August 2014
Omelette pizza
No, it's nothing like a pizza really and it's very simple and not fancy at all. I was wondering how to do my tomatoes and eggs for breakfast and I did this. No photo - the camera battery was dead!
If you use tomatoes from your garden it is pretty frugal. If you use eggs that a lovely friend gave you, even more so! If not, it is not dreadfully dear but not cheap either. Nice for a treat at the weekend.
Ingredients:
A small knob of butter
Ripe tomatoes, halved or quartered depending on the size. i used about twelve cherry tomatoes from the garden
A little oil
Two eggs
Some feta, crumbled
Seasonings - I just used salt but you could use herbs too.
Method:
Melt the butter in a small, non stick pan, add the tomatoes and saute, then simmer as the juice is released, until they are soft and the released water has more or less evaporated.
Remove from the pan and keep hot.
Wipe the pan round with a damp cloth or some kitchen towel.
Add the oil and heat.
Break the eggs into a bowl, add some salt and whisk until nice and frothy.
Pour the egg into the pan and fry gently until most of the egg has set, then turn over to finish cooking (it is easy to turn by then).
Slide the omelette onto a warm plate, spread over the hot tomatoes, sprinkle with a little sea salt and then toss over the crumbled feta.
Eat straight away. Scrummy!
Note: if the tomatoes have tough skins, remove them first by pouring over boiling water, leaving them for a minute and then sliding off the skins.
Friday, 29 August 2014
Recipe: Courgette and lemon jam
You're going to be sick and tired of all these preserving entries, sorry. However, I must post this one.
You can find it at http://www.theguardian.com/lifeandstyle/2011/sep/02/vegetable-jam-recipes-hugh-fearnley-whittingstall ( scroll to the bottom) so I will just describe what I did.
Beth gave me a ginormous yellow courgette. I weighed it and it was 2K in weight. As I needed 1k for this recipe and it was hoooge, I decided to peel and seed it but the recipe doesn't say that.
I mixed it with the sugar (I used jam sugar because I had great doubts about courgette and pectin) and added the lemon and straight away it started smelling wonderful. I left the marrow mix to macerate all day rather than overnight.
Before starting to cook it, I added one medium cooking apple, peeled, cored and chopped. Again, for the pectin.
Apart from that I just followed the recipe without using the lemon verbena leaves because I didn't have any and, yes, it did need to boil for a while but it set beautifully and tastes - golden! A bit like a gentle lemon marmalade really.
Definitely one to do again and as there was a bit that wouldn't fit into a jar (shame, that) I am having it on toast for breakfast and it's nice. I would quite happily have more but I'm not going to!
Thursday, 28 August 2014
Recipe: Gorgeous tomato soup: Thermomix and normal way
I got this from here: http://www.theguardian.com/lifeandstyle/wordofmouth/2012/jun/14/how-to-cook-perfect-tomato-soup
I didn't follow it exactly because I didn't have basil (and don't actually like it - sorry) or creme fraiche but it's gorgeous without.
I made enough for one, it was simply delicious being both savoury and sweet all in one, a mixture of tomatoes from the garden; it was rather like a very, very superior tinned 'cream of tomato soup' without the artificial flavour.
Here's what I did.
Ingredients:
300g ripe tomatoes (from the garden which is why there's such sweetness, I guess), halved.
some olive oil - as little as possible but you do need it.
pinch sugar (small pinch), salt and pepper
1 small onion or part of a bigger one, peeled and chopped
about 1/3 of a carrot, peeled, if necessary, and chopped
garlic puree - a little squidge
200 mls chicken stock (I used those knorr stock pot thingies and used about 1/2)
about 1tsp balsamic vinegar
Method:
Preheat the oven to about 180. Arrange the tomatoes, cut side up, in a baking dish, drizzle with a little oil and season with salt (not much because of the stock, more if you're using fresh stock), pepper and a very small pinch of sugar. Bake for about 45 mins (the recipe says 1 hr but it was ready before then) until softening and starting to char around the edges.
I then removed the skins where I could because some of the tomato skins are quite thick but, seeing as I then ate the skins and they were delicious and not at all tough, I doubt that was actually necessary!
Then, the non-Thermione way
Heat the remaining oil in a pan over a medium heat and add the chopped onion, carrot and garlic. Cook, stirring regularly, until softened.
Add the tomatoes to the pan with the pan juices and scrapings, the stock and the vinegar (rather than use it as a garnish).
Bring to a slow boil, stir well, cover and simmer until the veg are soft.
Cool slightly and puree until it is the texture you want.
At this point you stir in the creme fraiche, if using it, check the seasoning and adjust. Gently reheat and serve.
The Thermione way:
Place the roughly shopped carrot and onion in the bowl with a little oil and pulse VERY briefly - you want bits, not a paste. Saute on 100, 6 mins, speed 1/2
Add the garlic, the tomatoes and juices, the stock and the vinegar.
Cook on 100/about 12 mins/speed 1/2.
When the veg are soft allow to cool a little and then blend on speed 10 for around a minute (I like a very smooth soup). Check seasoning and adjust.
Either serve immediately or leave in the bowl until mealtime, then gently reheat to 10, speed 1/2 before serving.
I'm going to make this again soon, maybe for school on Monday. A treat never went amiss on the first day of the school year, did it?
31-08-14: I've just made the full recipe, minus the basil (still yuck) and adding the balsamic vinegar with the stock. The tomatoes still had stalky bits inside so right at the end I pushed the lot through a sieve to get the final 'bits' out. It worked a treat and the creme fraiche as a garnish also worked really well. That's several school lunches sorted now - and I am assuming it will freeze well as it has nothing in it that won't freeze.
The next step is to try it with a vegetable stock.
Tuesday, 26 August 2014
Recipe: plum and apple sauce with allspice
Carrying on from the last entry, after making the plum jelly I had a load of soft pulp which I certainly wasn't going to throw away.
First of all I pushed it through a sieve to extract all the soft pulp and leave behing the skin (which then got binned)
Then I looked at my fruit supply and decided that some of the apples really should be used soon. I cut off the bad bits, chopped the rest and stewed it in a little water until soft, then pushed that through a sieve too.
I mixed the plum and apple purees, added some jam sugar (more or less pound for pint, just a bit less that that) and also added some ground allspice and some lemon juice.
Then (and this is where I diverted from the usual method) I bunged it all in Thermione and set it to heat and boil on Varoma, reverse speed 3 until setting point was reached.
Otherwise I would have popped it into a suitable pan and done it the usual way!
It took a while to set and the texture is 'pulpy', not smooth, but it's lovely!
Monday, 25 August 2014
Recipe: plum jelly
I don't do jellies very much, not the crystal clear, glowing jellies. It seems such a shocking waste of fruit and you don't get much out of your kilo in terms of jars filled.
However, after managing to get 3 kilos of plums for a ridiculously small amount in Morrisons and having made jams and chutneys seemingly endlessly, I decided that I would like to make some jelly. It came out beautifully and this is what I did - it's a bogstandard method so if you're a jelly expert, no need to read any further!
Ingredients.
plums
water
jam sugar (not preserving sugar, that is different - jam sugar has pectin added and plums are not naturally high in pectin)
Method:
Wash the plums. Remove the stones and cut off any bad bits.
Place the plums in a saucepan and add water to half way up the plums, so not an awful lot.
Bring to a simmer and cook until the plums are really soft and there is a lot of juice.
At this point, if you have a jelly bag, set it up and strain the plums through the jelly bag. I really couldn't be bothered to go out in the rain to the garage to get mine so I put a sieve over a bowl, lay a muslin inside the sieve and strain it that way. The important thing is not to squeeze or push the plums through, just let the liquid drip through. That way you get a really clear jelly. Set the pulp aside (see next entry).
Measure the liquid and for every pint of liquid add 1lb of jam sugar.
Heat slowly, stirring more or less continuously until the sugar has dissolved. Then turn up the heat and bring to a good boil.
While it is getting to a boil, put two saucers in the fridge to test for setting point and place your very clean jam jars (Not clean? Wash them then!) in a coolish oven to heat up or do what I do and boil a kettle of water and fill each jar with boiling water. While the jam is standing after reaching setting point I drain out the water and allow the heat of the jar to evaporate any remaining dampness.
After about ten minutes of boiling and stirring now and again, remove from the heat and test for setting point*. If it hasn't reached setting point, replace on the heat and boil for another five minutes or so.
When setting point is reached, remove from the heat and allow to stand for a short time. Then skim off any 'scum' (which is actually absolutely fine but spoils the look of the jelly) before ladling into the hot jars, sealing and labelling.
* I go on about setting point and saucers. This clip shows what I mean - it starts around 5:11.
However, after managing to get 3 kilos of plums for a ridiculously small amount in Morrisons and having made jams and chutneys seemingly endlessly, I decided that I would like to make some jelly. It came out beautifully and this is what I did - it's a bogstandard method so if you're a jelly expert, no need to read any further!
 |
plums
water
jam sugar (not preserving sugar, that is different - jam sugar has pectin added and plums are not naturally high in pectin)
Method:
Wash the plums. Remove the stones and cut off any bad bits.
Place the plums in a saucepan and add water to half way up the plums, so not an awful lot.
Bring to a simmer and cook until the plums are really soft and there is a lot of juice.
At this point, if you have a jelly bag, set it up and strain the plums through the jelly bag. I really couldn't be bothered to go out in the rain to the garage to get mine so I put a sieve over a bowl, lay a muslin inside the sieve and strain it that way. The important thing is not to squeeze or push the plums through, just let the liquid drip through. That way you get a really clear jelly. Set the pulp aside (see next entry).
Measure the liquid and for every pint of liquid add 1lb of jam sugar.
Heat slowly, stirring more or less continuously until the sugar has dissolved. Then turn up the heat and bring to a good boil.
While it is getting to a boil, put two saucers in the fridge to test for setting point and place your very clean jam jars (Not clean? Wash them then!) in a coolish oven to heat up or do what I do and boil a kettle of water and fill each jar with boiling water. While the jam is standing after reaching setting point I drain out the water and allow the heat of the jar to evaporate any remaining dampness.
After about ten minutes of boiling and stirring now and again, remove from the heat and test for setting point*. If it hasn't reached setting point, replace on the heat and boil for another five minutes or so.
When setting point is reached, remove from the heat and allow to stand for a short time. Then skim off any 'scum' (which is actually absolutely fine but spoils the look of the jelly) before ladling into the hot jars, sealing and labelling.
* I go on about setting point and saucers. This clip shows what I mean - it starts around 5:11.
Recipe: Red onion marmalade
 |
This is the recipe, here, if you would like to see the original.
Ingredients:
1 good tbsp olive oil and a dollop of butter The original recipe says extra virgin but I don't see the point, given how long it has to be cooked and I added the butter because I wanted to.
1kg red onions
(approx. 6), peeled, halved and sliced I didn't have enough so used some white onions and I sliced them by hand because that way you can get the thickness you want.
Sea salt and freshly
ground black pepper
150ml red wine
3 tbsp balsamic
vinegar
3 tbsp white wine
vinegar
6 tbsp light soft
brown sugar
Method:
Heat the oil and butter. Add the onions with some ground black pepper and a good pinch of sea salt. Stir well.
Cook over low to
medium heat for about 30 minutes or longer until the onions soften and turn translucent,
stirring occasionally so they don’t catch and burn. Slow cooking is essential
at this point as this is where the delicious caramel taste is developed.
Increase the heat just a bit and add the wine and the vinegars. Boil, reduce the heat and add the sugar, stirring well.
Cook on the low heat for around 30 to 40 mins until most of the liquid has evaporated. Don't forget to stir occasionally to prevent sticking.
Clean and heat your jam jars.
Take the pan off the heat, taste and adjust the seasoning if necessary, although the flavours
do mature with time and I found that it was just right last time.. Spoon into the warm, clean jars, cover with waxed paper discs,and screw on the lid (non metallic or coated with plastic), making sure there are no air gaps (I push the mixture down with a spoon to make sure), tighten the lids and label. Store in a cool, dark place for at least 1 month to
allow the flavours to develop. It keeps for around three months, the recipe says, although I had some after four months and it was gorgeous!
Friday, 22 August 2014
Recipe: Thermomix white bread: frugal
Using ordinary bread flour with no clever additions it's better value and better tasting than anything you can buy. I always use Thermione now and this is what I do. Never known to fail (except when I forgot to add the yeast)!
Ever since the accidental third rising that resulted in such a good loaf, I have added another rising to my normal breadmaking but it doesn't seem to add all that much time to the process. Once the dough gets going it really gets going.
Ingredients to make one larger loaf or two smaller loaves (or rolls).
500g strong white flour
1 slightly heaped tsp dried yeast (the kind that doesn't need starting off)
1 tsp salt
a dollop of butter or a sploosh of oil (around 20g of it)
315g warm water
(I sometimes also add 1 heaped tbsp dried milk powder - it makes a softer loaf)
Method:
Place the flour, yeast, salt, oil and water in the bowl in that order. Give it a bit of a zizz to mix.
8 minutes/bread setting to knead the dough. Longer if you like but there is a danger of overworking the dough. I find 8 mins is just about right.
Leave the dough in in the bowl (lid and MC on) to rise. When it has risen to about 2/3 of the way up the bowl, knead it for another minute to knock it all back. Then carefully scrape down any dough that has stuck up the sides - there isn't usually any but just occasionally there is.
Leave in the bowl again to rise 2/3 of the way up the bowl. With your fingers push the dough away from the sides of the bowl and then tip out onto a floured surface. Knock back, shape and place in your loaf tin(s).
Switch on the oven (I start at 220C and turn down to 200C when the bread goes in).
Sprinkle flour over, cover with a cloth, some easy-leave wrap or similar, prove (until the top is level with the top of the tin) and bake. Two small loaves take about half an hour but is not an exact science. To check, remove the loaf from the tin and tap the bottom; it should sound hollow. If it doesn't, replace in the oven without the tin and give it/them another five minutes or so.
It is so, so easy and all you need is to be in the house. I don't recommend going out and doing the shopping or anything. I swear that dough KNOWS when you are not there and seizes the chance to escape!
Finally, just to say that I always use greasproof liners when I bake bread. You can buy all sorts of shapes liners and there will be one just right for your tins. Absolutely no risk of sticking and no need to wash the tin afterwards.
Ever since the accidental third rising that resulted in such a good loaf, I have added another rising to my normal breadmaking but it doesn't seem to add all that much time to the process. Once the dough gets going it really gets going.
| Borrowed from Google. |
500g strong white flour
1 slightly heaped tsp dried yeast (the kind that doesn't need starting off)
1 tsp salt
a dollop of butter or a sploosh of oil (around 20g of it)
315g warm water
(I sometimes also add 1 heaped tbsp dried milk powder - it makes a softer loaf)
Method:
Place the flour, yeast, salt, oil and water in the bowl in that order. Give it a bit of a zizz to mix.
8 minutes/bread setting to knead the dough. Longer if you like but there is a danger of overworking the dough. I find 8 mins is just about right.
Leave the dough in in the bowl (lid and MC on) to rise. When it has risen to about 2/3 of the way up the bowl, knead it for another minute to knock it all back. Then carefully scrape down any dough that has stuck up the sides - there isn't usually any but just occasionally there is.
Leave in the bowl again to rise 2/3 of the way up the bowl. With your fingers push the dough away from the sides of the bowl and then tip out onto a floured surface. Knock back, shape and place in your loaf tin(s).
Switch on the oven (I start at 220C and turn down to 200C when the bread goes in).
Sprinkle flour over, cover with a cloth, some easy-leave wrap or similar, prove (until the top is level with the top of the tin) and bake. Two small loaves take about half an hour but is not an exact science. To check, remove the loaf from the tin and tap the bottom; it should sound hollow. If it doesn't, replace in the oven without the tin and give it/them another five minutes or so.
It is so, so easy and all you need is to be in the house. I don't recommend going out and doing the shopping or anything. I swear that dough KNOWS when you are not there and seizes the chance to escape!
Finally, just to say that I always use greasproof liners when I bake bread. You can buy all sorts of shapes liners and there will be one just right for your tins. Absolutely no risk of sticking and no need to wash the tin afterwards.
Wednesday, 20 August 2014
Joy's smooth(ish) cranberry sauce: thermomix
Christmas is closer than you think.

Of course I said yes. It sounds like great fun. It won't be a full roast turkey, of course, but you can get turkey breast, and the rest is a glorified roast dinner. Or, thinking about it, I might have a rolled turkey breast in the freezer. I could use that and then exist on the leftovers for the next few weeks.
It will be just after half term when I have time to prepare so I will be getting as much as possible ready beforehand. Hence this recipe, made out of my head, but nothing original except that I have never used Thermione to make a preserve before.
I like smoothish sauces. By that I mean no bits but not a clear jelly. Smooth with texture.
This is what I did.
Ingredients to make one jar of the Bonne Maman size.
200g frozen cranberries (I'd use fresh but they're not in the shops right now)
1 eating apple, washed, any bad bits cut off (and I also remove the stalk and the blossom bit too), chopped. No need to peel and core.
100ml (which is 100g weight) water
juice of half an orange and half a lemon
sugar (I used granulated)
Method:
Place the chopped apple and the cranberries, the orange and lemon juices (no need to thaw them) into the bowl and add a MCful of water (that's 100mls). At this point you could also add spices. I didn't, not this time, but cinnamon, mixed spice or star anise all would go very well.
Cook the fruit (and spices, if using) on 100 for around ten minutes on a slowish reverse speed, about 1/2 - reverse so that if you're using whole spices they won't get chopped to bits. When that has finished, check that the fruit is soft and mushy, take out any whole spices and blitz for around 10 seconds on speed 6.
Remove the lid very carefully (it is hot!) and pour the lot into a fine sieve over a bowl. Push the fruit through and discard what is left in the sieve.
(then put the sieve straight into a bowl of hot and soapy water because if you let it cool it will be the very devil to clean)
Now add the sugar. To be honest, I didn't measure it, I just stirred some in and tasted, stirred more in and tasted, until it was 'right'. As the mixture is hot, the sugar will dissolve quickly.
Pour the mixture back into the thermomix bowl. (I rinsed it out in between but I don't think you actually have to, it w3as just automatic to put it straight into water)
Put a saucer in the fridge if you use that method to check for set.
Cook on Varoma heat, reverse speed 2 for around 6 minutes, then check for set, removing the bowl from the base as you check. If not set, cook for a couple more minutes and try again. If adding alcohol (e.g. port), add it after setting and give the mixture a few more seconds of stirring.
Pour into a clean, warm jar and seal. Don't forget to label the jar when it has cooled. Keep in a cool, dark place (I will keep it in the fridge)
|
| Not my photo but it will look like this. |
PLEASE BE VERY CAREFUL.
BOILING JAM IS EXTREMELY HOT AND HURTS IF YOU SPLASH SOME ON YOUR HAND.
Tuesday, 19 August 2014
Recipe: Jamie Oliver's ultimate hot chocolate: Thermomix
 |
| Not a good photo - far too dark. it gives you the general idea though. |
It isn't healthy - unless you subscribe to the 'dark chocolate adds years to your life' school of thought.
You can find it all over the Internet, such as here and here so I won't bother to reproduce it, I will describe how I made it in Thermione.
Ingredients to make enough for 16 servings (it says) - I made half quantities.
200g quality dark chocolate (70%)
100g good cocoa powder
100g icing sugar
50g cornflour
50g Horlicks
a pinch of sea salt
Thermomix method.
Place the chocolate in the fridge for a couple of hours to chill thoroughly.
Put the sugar in the bowl and blitz on pulse until it becomes icing sugar. Set aside.
Cut the chocolate into bits (I used a knife so my hands didn't warm it) and pulse until it is fine.
Add the sugar and the remaining ingredients and pulse again until nicely mixed.
Decant into an airtight jar and keep in a cool place.
To make the drink.
Spoon into the bowl two heaped tbsps of the powder (give the jar a shake first) and pour over one mug of milk.
Mix it on 6 for about five seconds.
Heat on 90/ speed 6 for around five or six minutes, until it hits temperature and then cooks for a minute. I didn't time it exactly, I'm afraid.
Pour back into the mug and enjoy.
I had it just like that and a mug was almost too much as it is gorgeously rich. Next time I will use one heaped tbsp and a cup of milk (my cups aren't huge).
Also next time I might add a good pinch of cinnamon. it would be wonderful with a dollop of cream and more grated chocolate or with marshmallows or nutmeg or orange or lemon zest or . . . oh, you get the idea.
It will also be fantastic as a Christmas present in a pretty jar with lots of additions.
Tuesday, 12 August 2014
Recipe: spiced apple cordial: frugal
This is a really easy recipe which makes a deliciously mulled non-alcoholic drink that can be made hot or cold.
It can be made using windfalls although if there's too much bruising or other bad bits you might need to add a few more. It's a very forgiving recipe so amounts can vary according to taste.
If you are able to use windfalls or have, in some other way, a free supply of apples as I did plus a range of 'sweet' spices in the cupboard, it is also a very frugal recipe.
Ingredients:
Around 1 kg apples, cooking and eating, providing the eaters have a good, strong flavour
1/2 stick of cinnamon or less
one star anise
a few cloves (I had to use a pinch of ground cloves)
some grated nutmeg
five or six juniper berries
a small piece of root ginger, bruised with the flat of a knife (or lazy ginger would do). Ground ginger would give a different flavour but would be nice all the same.
2 litres of water
About 1k of granulated sugar. I used less because the eating apples imparted sweetness but if you used all cookers you might need more. Taste and see.
You will also need a large, solid bottomed pan, a jelly bag or a muslin in a colander and suitable bottles for storing the cordial - sterilised screw topped wine bottles would be fine.
Method.
Wash the apples. Cut any bad bits out and roughly chop the rest
Place the apples in a pan with the spices and water.
Bring to a boil and simmer gently for about half an hour, until the apples are all soft. Turn off the heat, cover and allow to steep overnight.
Mash up the apples and then strain through a jelly bag or a muslin in a colander. Allow it to drip through for a while, covered. I left mine all day.
(Don't throw away the pulp. Strain it through a mouli or a sieve and use it for apple sauce, apple and cranberry sauce or whatever. It will freeze.)
Put the liquid back into the clean pan and add around 750g granulated sugar. Slowly reheat, stirring now and again, so the sugar dissolves. Taste and add sugar as needed for own taste. Bring to a boil and simmer well for around ten minutes or so.
Then decant into hot, sterilised bottles or jars.
When cooled, this keeps well in the fridge. I am told it will last a year but mine never lasts that long!
To use, dilute with hot or boiling water, or add ice cubes and cold water. It makes a refreshing drink with sparkling water.
It can be added to hot red wine or cider to make a spicy punch, adding fruit (apple and orange slices, grapes, etc) to the mixture.
I've never tried this but I gather you can use other fruit instead of some of the apples, such as plums or oranges.
In pretty bottles, this makes a lovely gift.
Saturday, 9 August 2014
Recipe: Pizza base
Home made pizza is wonderful. It is not likely to be 'authentic' but I don't care, it is wonderful so I thought I'd post the dough recipe I use.
Ingredients: To make two pizzas/feed four
300g strong bread flour
1 tsp instant yeast
1 tsp salt
1 tbsp olive oil
Method
Measure the flour into a large bowl, add the yeast and salt and stir in. Make a well and pour in the oil and 200 ml warm water, bringing it all together with a wooden spoon.
When it is a soft, fairly wet dough, turn out onto a floured surface and knead until smooth.
Then you can leave it to rise if you want a thick crust or use it straight away for a thin crust.
OR: Bung everything onto a Thermione, setting 4 minutes on the bread setting!!
After topping, bake in a preheated oven on preheated trays at 240C (lower if it's a fan oven) for around ten minutes or so.
I prepared everything else earlier: a tomato sauce, onion, mushroom, yellow pepper, ham and cheddar cheese.
It was very, very good - as my visitors kept saying as they devoured slice after slice after slice!
Recipe: Julian's Green Tomato Chutney
This is the recipe I used to make the green tomato chutney. It tastes good already but I am leaving to for a month or so before starting in on it. The only amendment I would suggest is to go easy with the cayenne - it definitely has a glow about it which I like but others might prefer a little less heat.
Also I used a mix of vinegars: brown and white malt.
It can be found on the Internet, here.
Ingredients:
600g green tomatoes
1 large onion, peeled and chopped
250g sultanas
250g dark brown sugar
1 tsp cayenne
1 tsp nutmeg (I just grated a whole one)
500mls malt vinegar
Chop everything up small (I used Thermione)
Bung it in a good, heavy bottomed pan
Slowly bring to a boil, stirring while the sugar dissolves
Simmer gently for ages, stirring now and again, until it has reduced down to a thick mass of goodness.
Pour into sterilised jars, seam and label.
I would leave it for a few months as it tasted a bit 'new'. I made double quantity and it gave me thirteen little pots full.
Thursday, 7 August 2014
Recipe: Thermomix lemon curd
I've posted this before but, having made some yesterday, I think it is well worth a re-posting.
Ingredients:
90g sugar
90g butter
3 eggs
3 lemons, juice only
Method:
Grind the sugar until castor or icing sugar consistency.
Add the butter, cubed, the eggs and the lemon juice. Zizz for a short while on 4 to 6.
Cook for four minutes, 90C, speed 3-4.
While it is cooking, prepare two jam jars and warm them in the oven or by pouring in boiling water.
Pour the curd into the hot, dry jars, cover (I use jam jar lids) and cool. Keep in the fridge and use within three weeks.
These ingredients can be done the microwave way or in a bowl over boiling water instead.
Sunday, 3 August 2014
Recipe: Hunter's Chicken part 2
It worked. It was tasty. So here it is. Amounts are not really exact, so sorry. In a way it is an idea, not a recipe.
Ingredients to serve 1 with some sauce leftover for another day
1 boneless, skinless chicken breast
a smallish onion, finely chopped
a dollop of butter - enough to saute the onion
a good pinch of smoked paprika
a pinch of mustard powder
a little bit of both garlic and chilli puree (to taste really)
two decent sized plum tomatoes, skinned and chopped (or some tinned chopped tomato - about half the can)
some cola - flat cola is fine. Allow about the same volume as the tomato
splash white wine vinegar
some balsamic vinegar
some tomato puree
salt
pepper
a slice back bacon
about 30g grated cheese
Method.
Saute the chopped onion in the butter until soft. Add the mustard powder, the smoked paprika, the chilli and garlic and stir well.
Add the chopped tomatoes and the cola. Bring to a gentle boil and simmer until the sauce is thickening.
Add the wine vinegar, balsamic vinegar, tomato puree, salt and pepper to taste.
Zizz to a fine paste (or leave it chunky, if you want - I zizzed).
Brush oil on foil. Lay the chicken on the foil and cut a slit along the top of the chicken.
Spoon in some of the sauce. Then lay the bacon over the top. Bring up the sides of the foil and seal to make a parcel.
Bake at about 180 until the chicken is cooked (about half an hour).
Open up the parcel, pour off the runny juices (they make a nice sauce to go with the vegetables), then sprinkle over the grated cheese. Replace in the oven and bake until the cheese has melted and is bubbling.
Serve with veg of choice - we had new potatoes and runner beans.
Recipe: Hunter's Chicken
I have Alex and Beth here for Sunday lunch. I have stacks of runner beans so don't want to make a salad. Beth and I are having something sort of quich-ish but Alex doesn't like quiche. So I thought Hunter's Chicken - my version of it anyway. After all, how hard can it be? A barbecue sauce, chicken, bacon and cheese. How can one go wrong (I hope this is not famous last words)
So, I shall make a barbecue sauce with onion, tomatoes from the garden, some leftover cola that has gone flat and various seasoning - bit of salt, pepper, mustard, smoked paprika, a bit of garlic and a bit of chilli.
When the chicken has thawed, I shall cut a slit along the top and fill it with the sauce. Then I shall lay some bacon over the top, wrap it in foil and bake until the chicken is cooked through. Then I shall uncover it, sprinkle over some cheddar and replace in the oven until the cheese has melted.
Sounds good to me and I will let you know . . . maybe with a proper recipe.
Sunday, 27 July 2014
Recipe: Courgette Appetisers (and Bisquick)
Oh, OK, it's really Zucchini Appetisers but this is an English blog so it's courgettes to thee and me!
It was sent to me by Joan, who sometimes comments on my other blog, Diary of a Teacher, and it was originally sent to her by an American friend. I'm grateful to both of them because this was delicious. It's not a quiche or an omelette or a frittata or anything like that. If anything it is a sort of savoury 'cake' but that's not the right word to use.
Of course, cheese and courgettes are a flavour match made in heaven anyway.
First of all you need to know how to make home-made Bisquick (I had to google this because I had no idea what it is) and as Joan sent a link to a recipe for that too, here it is. Please excuse the cup measures. This may be an English blog but I have no idea what they convert to in real weights!!
Home Made Bisquick
2 cups plain flour
3 tsp baking powder
1 tsp salt
2 tbsp shortening (butter or marg)
Mix all ingredients and blend until it resembles fine breadcrumbs (I did it in Thermione as you can imagine).
Store in a dry cool place and use as a substitute for Bisquick mix.
So, having got that out of the way, here's the recipe for courgette appetisers
Ingredients
3 cups thin sliced unpeeled courgette (although the joy of this is that it doesn't have to be courgette, it could be other veg too or instead)
1 cup bisquick (see above)
1/2 cup finely chopped onion
1/2 cup grated parmesan cheese (I used the not-parmesan version so it was vegetarian friendly)
2 tbsp chopped parsley
1/2 tsp salt (be wary - the cheese has salt already - I didn't add as much as this)
1 tsp chopped oregano (fresh)
Some black pepper
2 cloves garlic, finely chopped
1/2 cup vegetable oil
4 eggs, slightly beaten
You also need a rectangular pan or dish, well oiled.
Method:
Preheat oven to 170 C
Mix all the ingredients together well.
Spread into the pan or dish and level.
Bake until golden brown and set (about 25 mins)
Cut into pieces to serve.
It can be frozen and then reheated. Works well reheated in the microwave (it says)
Adapted for Thermione.
I made half the quantity of bisquick and set it aside. I sliced the courgettes by hand.
Then I chopped the onion, parmesan, parsley, salt, oregano, pepper and garlic together - speed 6 to 8 for about ten seconds; basically until it's all finely chopped.
I added one cup of bisquick mix (nearly all of it) and mixed it into the above ingredients (about four seconds on 6)
Then I added the oil and the eggs and gave it all a good zizz.
I mixed the batter with the sliced courgettes in a separate bowl to avoid breaking up the slices. Then I poured the mix into the dish and baked as above.
It was a doddle, absolutely delicious and very filling. We only needed a very simple salad with it although it would be nice (and evil) with chips.
As with the lemon courgette cake (by the way, that mixture does also bake well as muffins - I tried it today), this is definitely one to make again and a great way of using up some of those garden courgettes. I can see myself making this when my parents come to stay; I think they would really like it.
I think you could use grated cheddar, if wanted. It would taste different but still delicious. If I did that, I might cut down on the oil somewhat.
A very big thank you to Joan and her friend (who I haven't named because I don't know if she would want to be named in an open blog) for this recipe. I'm extremely grateful.
Wednesday, 23 July 2014
Recipe: chilli lentil and tomato soup
Just made this for lunch. It's flavoursome with a bit of a kick so I'm sharing.
It has made enough for four, more or less.
Ingredients:
two cans chopped tomatoes
one red onion, peeled and quartered
1 red chilli, seeded
a good glug of olive oil
80g lentils
10 mls marigold vegetable bouillon
1 tsp sugar
salt and pepper to taste
5 mls mixed dried herbs
water
Method for Thermione
Pour the chopped tomatoes into a roasting dish. Add the onion, the chilli and a good drizzed glug of olive oil. Roast in the oven at around 200C until you start getting black bits and a lovely roasted aroma.
In the TM bowl, zizz 90g red lentils until powdered.
Add the tomatoes, onion and chilli. marigold, mixed dried herbs, pepper and some water. Briefly zizz at speed 6. Cook at varoma heat, 15 to 20 mins, speed 3.
Allow to cool a bit, then blend on speed 9 for around a minute or so until smooth and gorgeous! Add more water if needed. Add the sugar and some salt, stir briefly and taste, adjusting seasoning if necessary.
Serve piping hot with a dollop of yogurt and some bread on the side. I might also swirl in some balsamic vinegar too.
Normal method:
Roast the tomatoes, onions and chilli as above.
Pour into a saucepan, add the lentils, herbs, pepper, water and cook until lentils are soft.
Zizz with a hgand blender, adding more water if needed. Add the sugar and sal, stir and taste.
Adjust seasoning if necessary
Serve as above.
Tuesday, 22 July 2014
Recipe: Roast dinner pie: leftovers
OK, so I had quite a lot of leftovers yesterday as grandson, for once, wasn't hungry (he was rather affected by the heat).
I had courgettes, peas, potato, chicken and gravy.
This is what I did with it.
First of all I peeled and thinly sliced a small red onion and gently sauteed it in some fat off the roast chicken until it was all soft.
Then in an oven proof dish I layered courgettes, onion, peas, chicken, peas, onion, courgettes. Then I poured over the gravy and a bit of the stock. I topped it with sliced potato and smeared over some butter, then baked it at around 170 for aboiut an hour (because I had a cake in the oven and that's what the cake recipe needed!
I could have added seasonings but it was already seasoned from yesterday so I didn't bother.
You know what - it was jolly nice!
Recipe: Lemon courgette cake
 |
| Borrowed from Google Images. |
I made this yesterday and there's another one in the oven as I type, the reason being that the batter isn't quite enough for two cakes in the size of tin I have and Beth wants to take one to a friend so, most unreasonably, doesn't want me to slice into it before I give it to her. I dunno, daughters!
While I might not have tasted it (yet), the smell is enough for me so I am happily sharing it here. It's on the internet so I can provide the link . . .
http://allrecipes.co.uk/recipe/5959/lemon-courgette-cake.aspx?o_is=Hub_TopRecipe_3
(I added some lemon oil to the mixture and it took a lot longer to cook than the recipe said - so be careful with that)
It's basically a muffin type batter and next time make it I will bake it in muffin tins rather than in a loaf tin which should shorten the cooking time.
It's not that expensive if you are given the courgettes.
Also, if you are a thermomix owner, adapting the method to your machine is an absolute doddle, dead easy.
Subscribe to:
Posts (Atom)